24/02/07 Stack, @RestController, @ResponseEntity
◈ 백준 스택(28278, 9012, 2493*)
■ Stack
●Stack 선언하기
- Stack<Integer> stack = new Stack<>();
- Stack stack<String> = new Stack<>();
- Stack stack<int[]> = new Stack<>(); // 배열도 가능!
● Stack에서 사용하는 Method
- .push();
- .pop();
- .empty();
- .peek();
◈ Spring
■ Restful WebService
● @RestController
- 반환값이 직접 HTTP응답으로 전송되므로 View 를 사용하지 않는다. 대신 JSON형식으로 변환되어 전달!!
++) @RestController = @Controller + @ResponseBody
##) @ResponseBody + @RequestBody:
클라이언트와 서버간의 비동기 통신을 하기위해 상호간에 메시지를 보낼때 본문에 데이터를 담아 보내는데 이것이 Body이다.
@RequestBody를 통해 Body내용을 자바객체로 변환.
@ResponseBody를 통해 자가 객체를 HTTP요청 바디 내용으로 매핑하여 클라이언트에 전달
( ※비동기 통신: 클라이언트가 서버에게 요청을 보내면 서버는 그 요청에 대한 응답을 기디리지않고 다른 작업을 수행할 수 있음)
※ @RestController , @Controller의 차이점은 View의 반환 여부 인것 같다.
@GetMapping("hello-world-bean")
public HelloWorldBean helloWorldBean() {
    return new HelloWorldBean("Hello World");
} // return값이 인스턴스값으로 들어가면 JSON형태로 자동변환(Jackson라이브러리 영향)
● @PathVariable
@GetMapping("hello-world-bean/path-variable/{name}")
public HelloWorldBean helloWorldBeanPathVariable(@PathVariable String name) {
    return new HelloWorldBean(String.format("Hello World, %s",name));
}
~/path-variable/{name}
~(@PathVariable String name)
{ }를 사용하여 적용이 가능하며, URL을 동적으로 처리할때 사용
● @Component
| 스테레오타입/마커 | 설명 |
| @Component | 스프링에서 스프링 관리 컴포넌트로 인식하는 마커, 즉 범용 스테레오타입이다. |
| @Repository | @Component 애너테이션을 특화한 것으로, 데이터 접근 객체의 역할을 수행한다. 다른 도구 또는 심지어 스프링 컨테이너 내부의 애스펙트에서 이 애너테이션을 붙인 클래스를 처리할 수 있다. |
| @Service | @Component 애너테이션을 특화한 것으로, 서비스 계층의 역할을 수행한다. |
| @Controller | 이 역시 @Component 애너테이션을 특화한 것으로, 일반적으로 웹 컨텍스트에서 사용된다. |
한마디로 구분을 위해서 @Component를 상속받는 @Repository, @Service, @Controller를 사용.
● ResponseEntity
| HTTP/1.1 200 OK ===== HTTP Status |
| Content-Type: text/html/charset=UTF-8... ===== HTTP Header |
| <html> <body>.... ===== HTTP Body |
<HTTP응답 메시지 구성>
HTTP의 응답을 제어할 수 있게 해주는 클래스.
@PostMapping("/users")
public ResponseEntity<User> createUser(@Valid @RequestBody User user) {
    User savedUser = service.save(user);

    URI location = ServletUriComponentsBuilder.fromCurrentRequest()
            .path("{id}")
            .buildAndExpand(savedUser.getId())
            .toUri();

    return ResponseEntity.created(location).build();
}
여기서는 @RequestBody가 user를 자바 객체로 변환 후 service.save(user)로 저장함과 동시에 URI를 생성하여 저장한
데이터의 URI주소까지
HTTP Header에 표기한다. @Valid는 유효성검사 수행(실패시 예외 발생)
ResponseEntity.created(Uri).build() --- created는 생성된 리소스의 위치정보(Uri)가 있어야함
※ URI만들기:
- ServletUriComponentsBuilder.fromCurrentRequest() ---- 현재 요청의 정보를 기반으로 URI를 만듬(Spring Utilty)
- .path("{/id}") --- URI정보를 확장하기 위한 부분. {id}는 치환된다
- .buildAndExpand(saveUser.getId()) --- 여기서 위의 id를 치환
- .toUri() --- URI를 생성하고 반환.
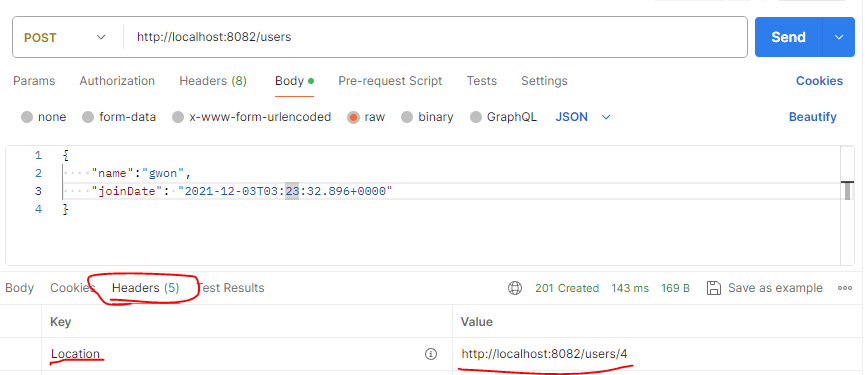
Status 201 Created, /users 에 값을 저장후 Headers태그의 Location에 /users4 생성